• Skip to primary navigation
  • Skip to main content
  • Skip to primary sidebar

That's So Primal

  • Home
  • About
  • My Story
  • Seasonings
  • Claim The Arsenal
  • 21 Day Challenge
  • Contact

The Primal Superpower Most People Ignore

Let’s talk about a real primal superpower that most people ignore. It’s not fancy. It won’t win any beauty contests. But it packs a massive nutritional punch you can’t afford to miss. We’re talking about eating small fish. Specifically, the kind that comes in a can. Yes, I know. It sounds a little unglamorous. It’s not a perfectly grilled steak (though I love those). But this is one of the easiest, most potent things you can do for your health, right now.

Why Eating Small Fish is a Primal Game Changer

Forget the big tuna. Forget the swordfish. Those big guys accumulate mercury. Small fish, like sardines, anchovies, and mackerel, are low on the food chain. They don’t live long enough to build up much of the bad stuff. What they do build up is pure gold for your body.

We’re talking about Omega-3 fatty acids here. The kind your brain craves. The kind that fights inflammation. The kind that supports your heart. Most people don’t get enough. A can of sardines changes that instantly. It’s a powerhouse of EPA and DHA. Look, your body can’t make these. You have to get them from food. And studies keep showing how critical Omega-3s are for brain health and overall well-being. This isn’t just about avoiding heart attacks. This is about thinking clearer, feeling better.

More Than Just Omega-3s

Beyond the fatty acids, these little guys are loaded. Vitamin D, for your bones and immune system. Calcium, for the same. Seriously, eat the bones. They’re soft, you won’t even notice them, and they are packed with minerals. Iron, B vitamins, selenium. It’s a whole multivitamin in a convenient, edible package. No weird fillers or synthetic junk. Just real food.

And the convenience factor? Unbeatable. Grab a can. Open it. Eat it. No cooking required (unless you want to get fancy, but you do you). You can store them in the pantry for ages. Perfect for a quick lunch, a snack, or when you just don’t feel like firing up the grill. As a busy dad, I can tell you, fast and healthy wins every time.

Making Eating Small Fish a Regular Habit

Okay, so maybe you’re thinking, “Randall, sardines? Really?” I get it. They’re not the prettiest. They might smell a little. But your health is worth a tiny bit of perceived awkwardness. Think of it as embracing your inner caveman. They didn’t care about presentation. They cared about nutrient density.

So, how do you actually make this happen? Start simple. Buy a can of good quality sardines in olive oil. My go-to for taste and quality are these Wild Planet Sardines in Olive Oil. Open it up. Drain some of the oil (or don’t, it’s good fat). Eat them straight out of the can. Yes, really. Add a dash of hot sauce. Or some sea salt. Try them with a fried egg. Mash them on some Primal-friendly crackers (if you do those). Or just eat them with a fork. It’s not gourmet, but it’s incredibly effective.

Anchovies are another good one. They’re saltier, often used to add umami flavor to dishes. Chop them up and throw them into a homemade salad dressing. Mix them into ground beef for burgers. My wife sometimes puts them on her pizza (who cares. Enjoy!). You won’t even taste the “fishiness,” just a deeper flavor.

Don’t Overthink It

The key here is consistency, not perfection. You don’t need a complicated recipe. You don’t need to be a chef (I’m certainly not). Just incorporate these little powerhouses into your routine. Swap out that afternoon snack that leaves you feeling sluggish for a can of mackerel. You’ll be surprised at how good you feel. You’ll feel satiated. You’ll be getting a ton of nutrients, like the Vitamin D and Calcium that are so crucial for bone health, without having to take a bunch of pills.

This is a primal hack at its finest. Low cost, high impact. It supports a healthy body without a lot of fuss. It aligns perfectly with what our ancestors would have prioritized: nutrient-dense, easily accessible food. For more ideas on simple, nutrient-dense foods, check out my post on easy primal meal prep. It’s all about making healthy eating sustainable, not a chore.

Primal Takeaway

Stop skipping the small fish.

They are cheap, convenient, and loaded with essential nutrients. Start with a can of sardines in olive oil this week. Eat them straight. Add hot sauce. Just eat them. Your brain, your bones, and your overall health will thank you.

Smoked Tri-Tip Will Make You Forget Brisket

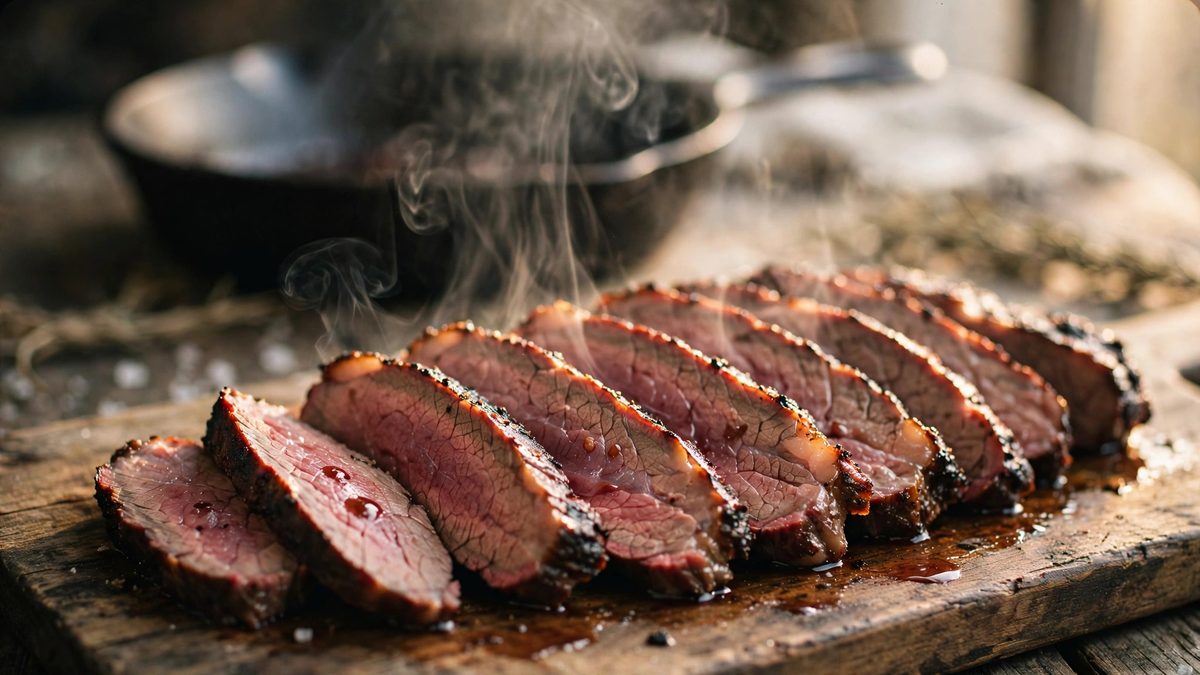
Let’s talk about the unsung hero of the grill: the tri-tip roast. If you haven’t ventured beyond brisket or ribeye, you’re missing out. This cut, sometimes called a Santa Maria steak, is packed with beefy flavor, takes on smoke beautifully, and is surprisingly forgiving. Today, we’re making a fantastic smoked tri-tip that’ll make you wonder why you waited so long.

I usually use my Masterbuilt charcoal smoker for this, but honestly, any smoker will do the job. Electric, pellet, offset – it doesn’t matter. The principles are the same. We’re going for a low-and-slow smoke followed by a hot, fast sear. This “reverse sear” method is a game-changer for a lot of cuts, but it truly shines with tri-tip.

Prepping Your Tri-Tip for the Smoker

First things first, get your hands on a good tri-tip. They’re usually around two to three pounds. Look for good marbling, which means more flavor and tenderness. Don’t be afraid to ask your butcher for one. They often have them in the back, even if they aren’t on display.

Once you have it home, pull it out of the packaging and pat it completely dry with paper towels. This helps the rub stick and encourages a better crust later. Don’t skip this step. Seriously.

For seasoning, I keep it simple. Real simple. A good coarse sea salt, fresh cracked black pepper, and maybe some garlic powder. That’s it. You don’t need a fancy, twenty-ingredient rub here. The meat’s flavor is the star. Some folks like to use a binder like mustard or olive oil, but I find just patting it dry and then applying the rub generously works perfectly. Coat all sides. Get in there.

Low and Slow: The Smoke Phase

Now, let’s get that smoker ready. You want to set it to a steady 225°F (107°C). Consistency is key here. If your smoker fluctuates wildly, try to keep it as close to 225°F as possible. For wood, I lean towards oak or hickory with beef. They give a nice, robust smoke flavor that complements the tri-tip perfectly. Cherry or apple are fine too if that’s what you have on hand, but for beef, I like something a bit stronger.

Place the seasoned tri-tip directly on the grates. Close the lid and let the smoke work its magic. We’re looking for an internal temperature of about 135°F (57°C). For a two to three-pound roast, this usually takes about an hour, maybe an hour and a half. Every piece of meat is different, and every smoker is different, so don’t just set a timer and walk away. Use a reliable meat thermometer. It’s your best friend in the kitchen (or backyard, in this case). If you don’t have one, I highly recommend picking up a good digital meat thermometer. It takes all the guesswork out of cooking meat.

When it hits 135°F, pull the tri-tip off the smoker. Don’t touch it. Resist the urge to cut into it. Put it on a cutting board or a plate and cover it loosely with foil. Now it’s time to crank up the heat.

The Searing Secret to Smoked Tri-Tip

This is where the magic happens. While your tri-tip rests, you need to get something screaming hot. You can do this by cranking up your smoker’s temperature, using a separate hot grill, or even a cast iron skillet on the stove. I usually just remove my tri-tip from the smoker, remove the wood chips, open the vents wide, and let the charcoal get ripping hot. Some people move it to a gas grill set to high heat. You do you.

Once your cooking surface is blazing hot, put the tri-tip back on. Sear it for about four minutes per side. You’re looking for a beautiful, dark, crusty bark. This is where all that flavor and texture really develop.

Keep an eye on the internal temperature during this searing phase. You want to pull the tri-tip off when it hits about 145°F (63°C). Now, I know what some of you are thinking: “Randall, 145°F? That’s medium! I like my beef medium-rare!” Hear me out. For tri-tip, medium is actually better. This temperature allows the fat within the cut to render down properly, making the meat incredibly tender and juicy. At medium-rare, some of that intramuscular fat can still be a bit chewy. Trust me, at 145°F, you’re going to have a much better experience. Think of it as optimal fat rendering for maximum flavor and tenderness. There’s some interesting science behind how cooking temperatures affect the structure of meat, making some cuts better at slightly higher temps. You can dig into it if you’re curious.

Once it hits 145°F, pull it off the heat immediately. Do not overcook it now. You’ve come too far.

The Final Steps: Rest and Slice

This is arguably the most important step after cooking. Let the tri-tip rest for at least 10-15 minutes, again, loosely tented with foil. This allows the juices to redistribute throughout the meat, keeping it moist and tender. If you cut into it too soon, all those precious juices will run out onto your cutting board, and you’ll end up with dry meat. Be patient. It’s worth it.

Finally, slicing. Tri-tip has a tricky grain structure. It actually has two distinct grain directions that meet in the middle. If you slice with the grain, your meat will be tough and stringy. You need to slice against the grain for maximum tenderness. Take a good look at your cooked tri-tip. You’ll see the muscle fibers running in one direction on one side, and then they’ll change direction. Cut the tri-tip in half at that junction. Then, slice each piece against its respective grain. Slice it fairly thin, about a quarter-inch thick. This ensures every bite is tender and delicious.

Serve it up with some roasted root vegetables, a big salad, or just on its own. This smoked tri-tip is proof that eating primal doesn’t mean sacrificing flavor or fun. It’s a simple, honest cut of beef, cooked right. Plus, red meat, prepared well, is a fantastic part of an ancestral diet. It’s packed with nutrients, after all.

Primal Takeaway

Don’t fear the smoker. Get a tri-tip, cook it low and slow to 135°F, sear it hot to 145°F, let it rest, and slice against the grain for a seriously tasty, primal meal.

Why You Need to Stop Exercising and Start Moving

The Trap of the Modern Workout 

We have a fundamental misunderstanding of how the human machine works. We sit in climate-controlled boxes for ten hours a day, staring at screens, and then try to undo all that damage by running on a treadmill for 30 minutes. Modern exercise is often just about burning calories. But your body does not care about your gym membership. It cares about capability.

Our ancestors did not schedule time to exercise. They just lived. They walked, carried heavy things, and occasionally sprinted. This constant, low-level activity kept their joints lubricated and their metabolisms firing. Today, we have traded our vitality for convenience. It is time to shift the focus from “working out” to primal daily movement.

Rejecting Sedentarism 

If you sit for more than 60 minutes at a time, your metabolism starts to shut down. The new standard is simple. We simply refuse to rot. Incorporating primal daily movement means finding excuses to move your body throughout the normal course of your day. Take the stairs. Carry your groceries instead of using a cart. Play with your kids on the floor.

You cannot eat your way out of a sedentary life. You can have the cleanest diet in the world, but if your muscles are never challenged by gravity, your bones will weaken. Medical literature is catching up to this ancestral truth, showing that frequent, light movement is vastly superior to prolonged sitting interrupted by short bursts of intense exercise, dramatically improving metabolic control.

The Power of the Heavy Carry 

You do not need a fancy gym or complicated machines. Most gym equipment is designed to be a clothes hanger. To build real durability, you just need gravity and a heavy object. The heavy carry (or farmer’s walk) is one of the most functional movements a human can perform. Pick up something heavy and walk until your grip fails.

I keep a heavy Cast Iron Kettlebell in my garage. It takes up zero space and delivers massive results. When I need a break from my desk, I grab the bell, walk down the driveway, and walk back. It spikes my heart rate, engages the core, and reminds my nervous system that it is alive. Grip strength isn’t just about your forearms; it is actually one of the leading indicators of overall systemic health and longevity.

Walk Like a Human 

We are built to cover ground. The daily walk is the cornerstone of primal daily movement. Get outside in the morning. Natural light hitting your eyes triggers an immediate elevation in cortisol to wake you up and starts the timer for melatonin release at night.

When you walk, try to do it without headphones. Listen to your environment. Take your shoes off if you can and walk barefoot on the dirt or grass. This helps discharge the static of the modern world and grounds you to reality. If you want to know more about fixing your footwear, look into minimalist shoes. Transitioning to zero-drop, wide-toe box footwear actually forces your intrinsic foot muscles to engage and build real strength.

The Science Behind Primal Movement

  • Metabolic Control Over Gym Sessions: Breaking up prolonged sitting with light, frequent movement does more for your metabolism and glycemic control than sitting all day and working out for 45 minutes.
  • Grip Strength as a Mortality Predictor: The massive PURE study, analyzing nearly 140,000 individuals, proved that diminished grip strength is a massive, inexpensive risk-indicator for cardiovascular issues and all-cause mortality.
  • Morning Light & Circadian Rhythms: Stepping outside into natural morning light creates a rapid spike in your cortisol awakening response, anchoring your circadian rhythm to the real world instead of a screen.
  • Foot Durability: Ditching padded modern sneakers for minimalist footwear strengthens the intrinsic muscles of the foot simply by allowing them to function the way nature intended.

Primal Gear to Get Started (Support the Mission)

  • Cast Iron Kettlebell: The only piece of equipment you actually need to build real-world durability and crushing grip strength.
  • Minimalist Barefoot Shoes: Zero-drop, wide toe box shoes to stop babying your feet and start rebuilding your arch strength.
  • Weighted Ruck Vest: Turn your morning walk into a loaded carry to bulletproof your joints and spike your daily calorie burn.

The Primal Takeaway Stop thinking of movement as a chore or a punishment for what you ate. Movement shouldn’t be a chore; it should be a celebration of what your body can do. Walk frequently, carry heavy things occasionally, and refuse to sit still for hours on end. The goal is to build a body that is durable and capable.

Pork Carnitas Bowls: High-Performance Fuel Without the Fake Shells

The Trap of the Modern Taco Night

We all love taco night. But the modern execution is usually a disaster for your gut. You go to a restaurant or grab a meal kit, and you are immediately bombarded with processed flour tortillas and cheap vegetable oils. Kitchens use cheap, oxidized seed oils for their cooking because it saves them money. But these industrial seed oils oxidize easily inside your body and cause a ton of inflammation.

You do not have to give up the flavor to stay healthy. You just need to strip away the processed garbage and rebuild the meal around real food. That is exactly why I rely on a primal carnitas bowl for weeknight dinners. It is all the savory, smoky flavor you want, packed into a clean format that actually fuels your body instead of slowing it down.

Building the Primal Carnitas Bowl

The foundation of a good primal carnitas bowl is the meat. Pork shoulder is one of the best cuts you can buy. It is affordable, nutrient-dense, and practically impossible to mess up if you cook it low and slow.

Instead of dealing with a smoker or a temperamental grill, we are taking this indoors and using one of the most reliable methods in culinary history: slow-roasting in a Dutch oven. By aggressively seasoning the pork with salt, garlic, and cumin, and braising it in a simple liquid of lime juice and water, you break down the tough connective tissues. The result is perfectly pull-apart, tender meat packed with flavor.

Instead of wrapping this high-quality meat in a processed shell, we use a clean base. I have the plate assembled where we serve it in a wide bowl with white Basmati rice. If you are active, Basmati is an excellent carbohydrate choice because it has the lowest glycemic index of the rices and is easy on digestion. You then top the rice with your shredded pork, fresh avocado for stable fats, and a heavy garnish of cilantro. It is a perfectly balanced plate engineered for performance.

The Science of Slow-Roasted Protein

Cooking meat low and slow isn’t just about taste; it is biologically optimal. Breaking down tough cuts of meat like pork shoulder releases collagen and gelatin, which are incredibly beneficial for your gut and joints. Here is the clinical data backing up why a meat-heavy, slow-cooked bowl like this should be a staple in your diet:

  • Protein and Satiety: Clinical data shows that high-protein meals significantly increase satiety, preventing the blood sugar crashes that lead to junk food cravings.
  • Collagen Synthesis: Slow-roasting tough cuts of pork breaks down connective tissues into gelatin and collagen, which supports joint health and tissue repair.
  • Reduced AGEs Formation: Cooking meat with moist heat at lower temperatures (like in a Dutch oven) significantly reduces the formation of Advanced Glycation End-products (AGEs) compared to high-heat grilling or frying, protecting your cells from oxidative stress.
  • Metabolic Advantage: Diets high in quality animal proteins boost thermogenesis, meaning your body burns more calories simply digesting the meal.

Ingredients

  • 5 lbs Pork Shoulder (Boston Butt): Cut into large 3-inch chunks.
  • 2 tbsp Sea Salt: Do not skimp on the salt; it tenderizes the meat.
  • 6 Cloves Garlic: Smashed and roughly chopped.
  • 1 tbsp Ground Cumin: For that deep, earthy flavor.
  • 1/2 cup Fresh Lime Juice: Acid is crucial for breaking down the meat fibers.
  • 1/2 cup Water: To create the braising environment.
  • For the Bowl Assembly: Cooked white Basmati rice, sliced avocado, fresh cilantro, and extra lime wedges.

5-Step Dutch Oven Carnitas

  1. Prep the Meat: Preheat your oven to 300°F. Cut the pork shoulder into large, uniform chunks and trim away only the heaviest, most excessive pieces of fat cap (leave most of it—fat is fuel and flavor).
  2. Season Aggressively: Toss the pork chunks thoroughly with the sea salt, smashed garlic, and ground cumin until every piece is evenly coated. Place the meat into your heavy Dutch oven.
  3. Add the Liquid: Pour the fresh lime juice and water over the seasoned pork. Give it a quick stir to combine.
  4. Slow Roast: Place the lid securely on the Dutch oven and transfer it to the oven. Let it roast undisturbed for 3 to 3.5 hours, or until the meat yields completely to a fork and easily falls apart.
  5. Shred and Assemble the Plate: Remove the Dutch oven from the oven. Using two forks, shred the pork directly in its own juices. To assemble the plate, grab a bowl and lay down a bed of Basmati rice. Add a heavy serving of the pulled carnitas on top. Finish the bowl by topping it generously with fresh sliced avocado and a handful of chopped cilantro.

Prep Once, Eat For Days

You should not be cooking from scratch every single night. Complexity is the enemy of consistency. If you want to stick to a clean lifestyle, you need to rely on batch cooking. Cook a massive 5-pound pork shoulder on Sunday so you can bank your calories for the busy week ahead. Having protein ready to go keeps you from making bad decisions when you are tired.

The Right Tools for the Job

Building a capable kitchen doesn’t require a hundred gadgets, just a few heavy-duty essentials. Here is exactly what I use to make meal prep a discipline rather than a chore (swap these with your setup to upgrade your kitchen):

  • Cast Iron Dutch Oven: This is the undisputed king of low-and-slow cooking. It traps heat and moisture perfectly to break down tough cuts of meat without drying them out.
  • High-Carbon 8-Inch Chef Knife: Stop sawing at your food with dull, serrated gadgets. You need one serious blade to handle breaking down a 5-pound pork roast and slicing delicate herbs with surgical precision.
  • Glass Meal Prep Containers: Heating food in plastic leaches endocrine-disrupting toxins directly into your meal. If you are batch cooking, you absolutely need heavy-duty glass containers to store and reheat your food safely.

The Primal Takeaway

Skip the inflammatory tortillas and fake oils. Slow-roast a heavy pork shoulder in a Dutch oven with salt, garlic, and cumin until it falls apart. Build your plate in a bowl with a clean base of Basmati rice, load it with the meat, and top it with avocado and cilantro for healthy fats and fresh flavor. Cook a massive batch on Sunday to secure your weeknight fuel. It is simple, affordable, and exactly what your biology is asking for.

The Only Two Knives Your Kitchen Actually Needs

Primal lifestyle scene

Walk into any kitchen store, and you’ll see walls of knives. Fillet knives, bread knives, boning knives, cleavers, santokus, utility knives. It’s enough to make your head spin. You don’t need all that. Seriously, don’t buy into the marketing hype. When it comes to essential kitchen knives, you really only need two. Maybe three if you get fancy with steak night (but you do you). For 99% of your home cooking, a good chef knife and a trusty paring knife will handle everything. That’s it. Simple, right?

Why Two Knives Are Enough for Your Kitchen

I’m not a gourmet chef. I’m a guy who cooks real food for his family. And in my experience, the more gadgets you have, the more cluttered your kitchen gets and the more confusing cooking becomes. Complexity kills consistency. We want simple. We want effective. A chef knife is your workhorse. It does 80% of the heavy lifting. Slicing meat, dicing onions (I’m still slow at that, no judgment), chopping vegetables. It’s the MVP. Your paring knife is for the smaller, more delicate jobs. Peeling an apple, trimming a strawberry, mincing a clove of garlic. Think of them as Batman and Robin for your cutting board.

You don’t need a separate knife for bread. A good chef knife can handle crusty loaves just fine with the right technique. You don’t need a boning knife unless you’re butchering whole animals every week (and if you are, hats off to you, but most of us aren’t). Focus on quality over quantity. Two great tools beat ten mediocre ones any day. These are the truly essential kitchen knives you’ll actually use.

What Makes a Good Chef Knife?

Okay, so you need a chef knife. But what kind? Don’t get hung up on brand names too much. What you’re looking for is a few key characteristics. First, the blade material. High-carbon stainless steel is usually the way to go. It holds an edge well and resists rust. Don’t fall for “ceramic” blades unless you like brittle tools that chip easily.

Second, the balance. This is huge. Pick up the knife. Does it feel heavy in your hand? Is it weighted nicely between the blade and the handle? You want it to feel like an extension of your arm, not some awkward club. A well-balanced knife makes chopping less tiring and more precise. Third, the handle. It should feel comfortable and secure. No slippery plastic, please. Riveted handles that are full tang (meaning the metal extends through the whole handle) are generally more durable. This isn’t just about comfort; it’s about safety too. You want a firm grip when you’re working with sharp objects. A good chef knife should last you years, even decades, if cared for properly. Quality truly matters here. For tips on how to prepare great meals without relying on processed ingredients, check out my post on cooking with good fats.

Keep ‘Em Sharp, Always

This is arguably the most important tip about knives: keep them sharp. A dull knife is dangerous. Seriously. You have to apply more pressure, and that’s when it slips and cuts you. A sharp knife glides through food with minimal effort, reducing the risk of accidents. It makes cooking more enjoyable, too. Nobody likes struggling through a tomato with a dull blade (it just squishes, right?).

How do you keep them sharp? You don’t need fancy electric sharpeners if you don’t want them. A simple honing steel will realign the edge regularly, and a good quality manual sharpener will bring back a true edge when needed. Don’t overthink it. Just sharpen them often. Weekly if you cook a lot. More often if you notice them dragging. Studies actually show that sharp knives reduce accidents in the kitchen by requiring less force and maintaining control. It’s worth the five minutes. It’s part of taking ownership of your health, even in the small things. After all, cooking at home is one of the best ways to improve your family’s health.

Randall’s Pick: A Solid Sharpener for Your Essential Kitchen Knives

Instead of specific knives, because what feels good to me might not feel good to you, I’ll recommend what keeps any good knife good. A quality sharpener. You can spend a lot of money on knives, but if you don’t maintain them, they’ll become useless. This good quality manual knife sharpener is a solid, no-frills option that gets the job done. It’s easy to use and will ensure your chef knife and paring knife are always ready for action. Sharpen them often, and they’ll serve you well for years.

“Okay, Randall, but I need to know what two knives to get.”

I hear you. If you don’t want to overthink the specifications and just want me to tell you exactly what to add to your cart, go with Wüsthof. They perfectly nail the high-carbon stainless steel, full-tang construction, and ideal balance I just talked about. If I were outfitting a kitchen from scratch today, I’d grab the Wüsthof Classic 8-Inch Chef’s Knife for the heavy lifting and the Wüsthof Classic 3.5-Inch Paring Knife for the detail work. Buy these two, treat them right, and you’ll never need to buy another knife again. 

Primal Takeaway

Don’t clutter your kitchen with unnecessary tools. Invest in one high-quality chef knife and a good paring knife. Keep them consistently sharp. That’s all you need for primal cooking.

Next Page »

Primary Sidebar

Howdy, Y’all…

Craving a deeper connection to your food and a life lived in harmony with nature? This is your one-stop shop for all things primal living! Dive into informative articles exploring the ancestral approach to health and wellness. Get your paleo and primal recipe fix with delicious, nourishing creations that fuel your body. And learn how to integrate primal practices into your daily routine, from nose-to-tail eating to mindfulness tips – thatssoprimal.com is your guide to unlocking your inner primal self!
Read more…

Categories

  • About
  • Activities
  • Beef
  • Book Reviews
  • Desserts
  • Essential Tools
  • Insects
  • Interviews
  • Lifestyle
  • Pork
  • Product Reviews
  • Recipes
  • Sides
  • Snacks
  • Soups
  • Vegetables

Recent Posts

  • The Primal Superpower Most People Ignore
  • Smoked Tri-Tip Will Make You Forget Brisket
  • Why You Need to Stop Exercising and Start Moving
  • Pork Carnitas Bowls: High-Performance Fuel Without the Fake Shells
  • The Only Two Knives Your Kitchen Actually Needs

AD

CLAIM THE ARSENAL

Copyright © 2026 That's So Primal on the Foodie Pro Theme